
Core training is one of the most talked about, often misunderstood, and hotly debated topics in the health and fitness industry, and it is one of the most common topics on which we get questions here at the clinic. In this article our goal is to dispel some of the common myths and provide you with step-by-step protocol to help you achieve a strong and functional core.
What is the “Core”?
Fitness experts Robert Gajda and Richard Dominquez first used the term the “core” in their 1985 book, Total Body Training, to describe all of the muscles compromising the center of the body. The core is so much more than what we can see on a magazine cover: There’s the pelvic floor on the bottom, the diaphragm at the top, the rectus abdominis muscle in the front, the obliques (internal & external) on the sides, and the erectors as well as all the “ancillary” support musculature–paraspinals, multifidi, longissimus, iliocostalis (lumborum & thoracis), etc.– in the back.
In fact, the “core” consists of everything from the neck line down to the hips: pecs, lats, glutes, etc. Or, to be overly simplistic: everything not including the legs, arms, and head.
And its main job, contrary to popular belief, is not to crunch or perform countless sit-ups. Rather, the core’s main function is to counteract rotary movement so that force can be more easily (and efficiently) transferred from the lower body to the upper body, and vice versa. It is also critical for overall spine health and stability, and is often weak or not activated properly in people with back pain.
The “Six-pack”
Now that we know what the core is, let’s address the topic that’s on everyone’s mind: the elusive six-pack. Just so I’m perfectly clear: Doing core exercises alone will not give you a six-pack.
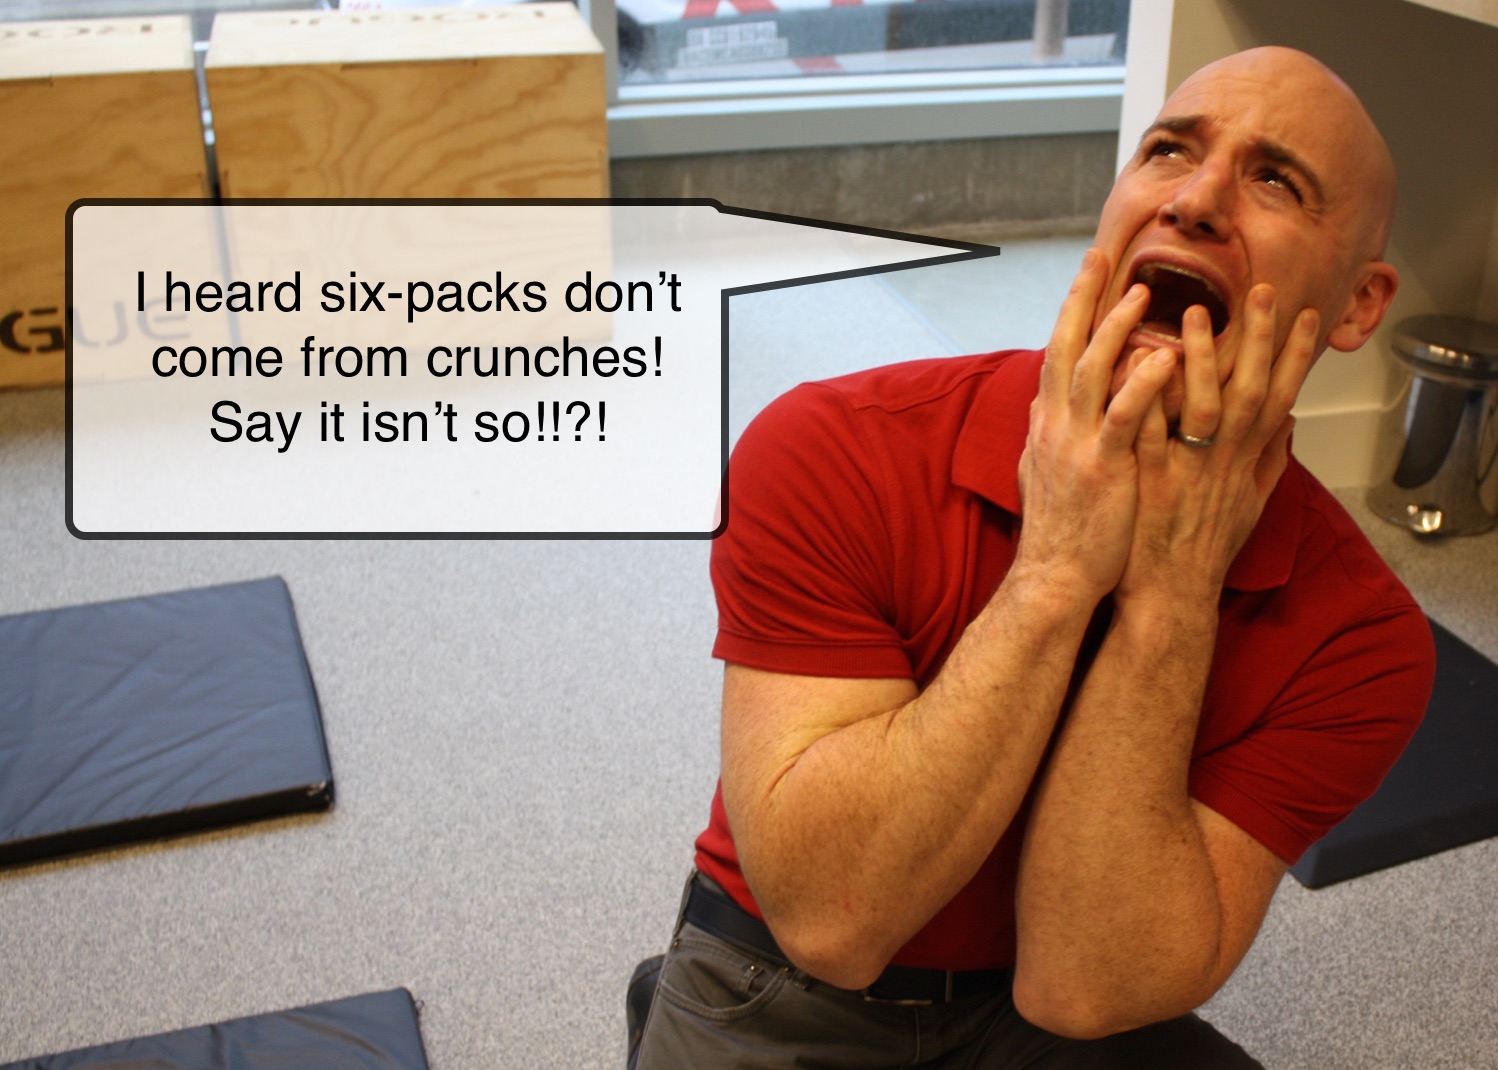
Yes, I know, stay with me here. The alleged six pack has almost nothing to do with core strength. Having visible abs is simply related to the amount of body fat you have (or don’t have) covering up your “Dear Abbies”. Ever seen a picture of a skinny 12-year-old boy with his shirt off? The fact that you can see his abs (and most of his skeleton) is because he is carrying around a low percentage of bodyfat, not because he has phenomenal core strength and development.
So, if you’re looking to save money on your laundry bill (because of your washboard abs), take a good hard look at what you’re putting in your mouth and your current caloric expenditure: great abs are made in the kitchen, not the gym. If you want a six pack, put down the fork.
However, can proper core training exercises in conjunction with a healthful diet give you cover model abs? Absolutely! This is one of those rare cases where we can have our cake and eat it too (not literally though). Let’s now move into our tutorial on how to activate, strengthen and create a functional and stable core.
Part 1: Breathing
The first step in learning how to effectively use the core seems a little counterintuitive, but proper execution of this can have positive long term impacts on your quality of life. What is it, you may ask? I’ll give you a hint: you do it 23,400 times per day (no, it’s not checking Facebook).
It’s Breathing.
Breathing is one of the most important, yet overlooked aspects we do every day as human beings. Proper breathing patterns can promote good posture, reduce stress, as well as a promote a whole host of other positive physiological functions.
One of the most remarkable aspects of the human body that has helped us survive and evolve for millions of years is our amazing adaptability. Or more simply put: We are what we do. The scientific term for this is SAID (Specific Adaptation to Imposed Demands). For example, if you decide to run 3 miles every day, you start out slow and feeling sore by the end of the run. Eventually though, the run is easy, faster, and you are pain-free afterwards. Your body becomes perfectly adapted to running 3 miles.
The bad news is that our body can adapt in negative ways as well (and many of these people end up in our office). Sit hunched over a desk for 8 hours a day? Your muscles will shorten and tighten to adapt to sitting with poor posture.
These same negative adaptations can be seen with poor breathing patterns. Are you breathing through your chest rather than your diaphragm throughout your day and as you sit reading this article?
It may not seem like a big deal, but if the diaphragm isn’t utilized like it should be when breathing, the muscles of upper chest (pectoralis major, pectoralis minor) and the throat (sternocleidomastoid and scalenes) will have to pick up the slack. Unfortunately, these muscles aren’t built for routine respiration, and they exhaust and eventually injure themselves. These muscles are often over-worked even more in smokers. Once these muscles get exhausted and injured from having to do the job of breathing all day, they have a hard time maintaining a neutral position and end up flexing forward and tightening, thus activating and overtaxing all the upper back and posterior neck muscles to support and pull chest muscles back into place. Now imagine sitting in this flexed forward position with a tight chest and straining upper back and neck muscles while you’re working at your desk for 8 hours a day 5 days a week. Not to mention all the other times during the day when you’re hunched forward chest breathing–watching TV, surfing the web, or using your cell phone.
If this sounds familiar, you are reinforcing and adapting to a bad habit 23,400 times a day. Every day.
Still think proper breathing mechanics isn’t a big deal?
This pattern needs to be corrected, and in the video below we’ll show you how to start breathing correctly.
Part 2: Finding Neutral
Once we have our good diaphragmatic breathing patterns dialed in, we can move into the next step of core development which is finding a neutral spine and pelvis position. Or, as many of our mothers constantly reminded us when we were young, stand up straight and tall. For a detailed scientific and anatomical explanation of this please read the section below. If not, skip down to our video on finding neutral spine and pelvic position.
Warning: science ahead!
In order to find a neutral position, we must align our spine and pelvis. Let’s talk about pelvis positioning first. When standing upright we tend to be in one of 3 positions: anterior pelvic tilt, posterior pelvic tilt, or neutral pelvis. Our goal is to find neutral.
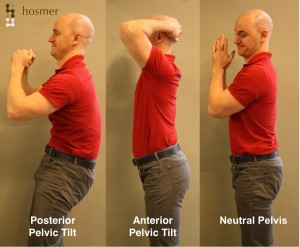
Think of your hips and pelvis as a big bowl of soup, and your goal is not to spill the soup. If you are standing with an anterior pelvic tilt (sticking your rear end out), your pelvis will tilt forward causing you to spill your imaginary bowl of soup down the front of your pants. That’s bad. Conversely, if you’re standing with a posterior pelvic tilt (hips forward, leaning backwards) your pelvis will tilt back causing you to spill your imaginary bowl of soup down the back of your pants. Also bad. So, your goal is to find the middle or neutral position where your pelvis is level and the imaginary soup is staying in the bowl.
Now that we’ve found neutral position with the pelvis, it’s time to address the spine. A neutral spinal position should be slightly S-shaped with a small lordotic (backward c-shaped) curvature in the cervical and lumbar spine and a small kyphotic forward c-shaped curvature in the thoracic spine. The easiest way to achieve this is to set the ribcage in the proper position. To do this, place one f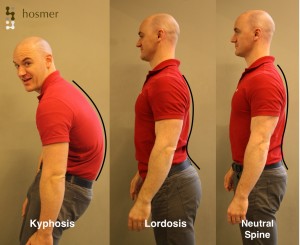 inger on your sternum and one finger on your belly button, and then bring these two points closer together like you are doing a crunch. This is spinal flexion and not the position we want. Now, think about increasing the distance between these two points like you are leaning backwards. This is an extended spinal position. Also bad. Find the position in which you are standing up perfectly straight with your rib cage pulled slightly down, and then lift your neck
nice and tall. This, combined with a level pelvis, should put your in a neutral spinal and pelvis position. We refer to this as the standing plank position.
With a little practice you should be able to find neutral while standing, but eventually you should work towards being able to be in neutral regardless of body position. In the video below we review finding neutral in both a standing and lying position.
Part 3: Death to Abdominal Hollowing! Enter the Brace!

“The Hoz” Haircut circa 1992
Abdominal Hollowing, or the idea of sucking your belly button in towards your spine in order to create core stability, is one of those well-meaning fitness ideas whose original meaning and purpose has become twisted. So much that, like the fanny pack, parachute pants, or your 1980s Flock of Seagulls haircut (aka The Hosmer), it just needs to go away. Sucking the belly button in and blowing the air out of your stomach actually creates less stability in your spine and under load can be potentially dangerous.
But what about engaging the Transverse Abdominus? For one reason or another it seems that popular fitness magazines and classes lately have been hammering on the importance of isolating and engaging the TA or Transverse Abdominus muscle, which, in case you are not familiar, is one of the lower abdominal muscles that runs like a belt an inch or two under your belly button. Is the transverse abdominus an important abdominal muscle? Yes. Should you be able to engage it on command? Yes. If you don’t actively suck your belly in towards your spine while flexing your TA when you do core work, will a basket of kittens die? Probably not.
The idea of muscle isolation is another of one those fitness myths that we want to see die, and we won’t go into it here, but just note it is impossible to work any of your ab muscles (or any muscle for that matter) in true isolation. While it is possible to preferentially engage one set of abdominal muscles slightly more than the other is true to a certain extent, at the end of the day, the ability to engage any of the ab muscles comes from the same nerve root in your spine, so it’s impossible to turn on one specific ab muscle without the rest of them firing as well. Don’t believe me? Go ahead and engage your precious TA muscle. Feel it flexing? Good. Now stick your fingers in upper abs. That tension you feel is the rectus abdominus or “6 pack” muscle firing.
So the idea of upper, lower and side ab isolation exercises is a little bit of a misnomer. We want you to start thinking of the core as one interconnected unit.
So, now that we’re no longer hollowing out our stomachs, how do we engage our core?? The simple answer is that we want you to brace. What do we mean by brace? Imagine that I’m going to come up a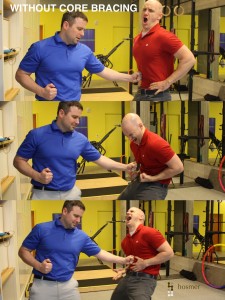 nd punch you in the stomach. What would you do to mitigate the blow? If your answer is suck your belly button in towards your spine, have your best friend punch you hard in the stomach. After you pick yourself up off the floor and the shooting pain subsides, is that still your answer?Hopefully you would probably take a deep breath, bring your ribcage slightly down and engage your abs like it’s nobody’s business. I bet your best friend’s punch didn’t hurt as much this time. The key to a good brace is utilizing not only your abdominal muscles, but also the air within your gut, commonly called intra-abdominal pressure. Remember all that diaphragmatic breathing you were practicing? Now it’s time to put that air to good use
Let’s try a little experiment. Take a deep belly breath then blow all the air out of your lungs. Try to get every possible bit of air out of your body and fee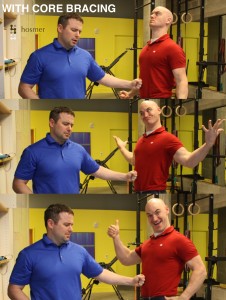 l that as you lose air pressure your ab muscles engage. At the end of the exhale, you should feel your ab muscles strongly engaging, but notice how they are lacking any “cushion” or support. Now take a full belly breath and blow out about a third of your air as you brace your stomach to absorb a punch. Notice how your abs still feel hard and engaged like the first experiment, but also how they now have
a little bit of cushion and support? That “cushion” is the air pressure within your stomach that is supporting your core musculature. This is the difference between using the passive and active supporting structures to withstand pressure. By adding the intra-abdominal pressure you are stronger. For an easy illustration of this, see the video below:
Now that we’re able to find a neutral spine and brace our abs correctly, it’s time to tie everything together. One of the best way to do this is with the “Dead Bug” exercise. We’ll show you a few variations in the video below, but the most important thing to remember when doing this exercise is the idea of intentionality. We are often taught to think th
at workouts are a time to unwind, turn our brains off and burn off some excessive energy, but save that for your time on the elliptical or jazzercising in your leopard leotard. What makes this exercise effective is the concentration you put in on maintaining perfect neutral alignment and keeping the core maximally engaged. If you think you are maximally engaging your core, I guarantee you’re not. There’s a lot more tension you can generate. If you are maximally engaging your core and fighting to maintain alignment and keeping a slow controlled tempo, you should be tired after performing 3-5 reps per side. If you are easily performing 15 reps and not feeling a significant burn in your core, you aren’t engaging or bracing as hard as you should be. This exercise is about intentionality. Brace hard and maintain your neutral spine!
Part 4: Training The Core
So, now that we’ve got our diaphragmatic breathing dialed in, we’re able to find neutral and brace, and we can confidently perform multiple sets of the Dead Bug exercise, we’re ready to progress to some other core work. If you haven’t mastered these 4 things, do not proceed with any of the following drills.
As we mentioned before, the main function of the core musculature is to provide stability and to resist movement (i.e. stay in neutral, thereby stabilizing the spine), so we need to incorporate exercises that challenge the core to maintain position. We do this through Reflexive Stabilization and Functional Training drills.
Reflexive Stabilization:
Simply put, reflexive stabilization is the body’s subconscious ability to react to an outside stimulus. Think of when you accidentally touch a hot burner on the stove and you instinctively pull your hand away without consciously thinking about it. Your core reacts much the same way. Throughout the day your core is reflexively turning on to stabilize your body as you change positions, to support your posture and a host of other jobs. Imagine if someone unexpectedly came up and pushed you from behind. The core (and a host of other muscles) should reflexively fire in order to help you maintain balance and re-align your body into a neutral position. Where we run into trouble is through injury in the region (often low back) or disuse. The core’s ability to reflexively stabilize diminishes; specifically, it begins to respond slower and with less strength as it did in the past. As a result, the body is not able to use to the core as effectively to prevent or protect itself from injury. So how do we activate and get the core firing again? We perform reflex stabilization exercises. A word of caution: unless you are dealing with a major dysfunction, reflex stabilization drills begin to have diminishing returns after about a month, so we recommend moving on to more Functional Core exercises after that time. It certainly won’t hurt to pepper these into your workout routine from time to time, but after the initial reflexive stabilization is restored, you will get much more bang for your buck performing more functional core training.
Part 5: Functional Training
This is where the majority of traditional core training and exercises fall into. Big picture-wise, the best way to functionally train the core is to turn every exercise into a core exercise. What do I mean by this? Pumping those guns to get ready for beach season? Try doing your bicep curls while maximally bracing your abs in a standing plank position. Pulling some heavy deadlifts and doing some squats? Engage that core!! Doing your Shake Weight routine while balancing on a bosu ball blindfolded performing single-leg pistol squats while fighting zombies? That core better be turned on.
There are a limitless number of great core exercises, but we’ve included some of our favorites in the video below. A few general guidelines to follow when performing core exercises:
1. In general, avoid core exercises with excessive spinal flexion or rotation. These include exercises like your traditional sit-ups, crunches, Russian twists, weighted side bends, etc. There are a few cases where some variations of these exercises are acceptable, but for the general population, we get enough flexion and rotation in our daily lives, so we don’t need to train those positions. In addition, they can be injury promoting movements, so best to leave them out.
2. Quality not Quantity. I am not interested in how heavy, how poorly or how quickly you can do an exercise badly. You will get better results out of 3 perfect reps than 10 crappy reps.
3. Train your core for strength and endurance. Your core should be trained for strength (handling heavy loads, such as maintaining proper spinal position during a heavy max effort squat) and for endurance (like holding a plank for long periods of time).
4. Turn every exercise into a core exercise. As we mentioned above, be mindful about your core throughout your entire workout–whether you’re doing ab exercises or not. You’ll be surprised at how difficult it is.
Part 6: Core Mindfulness
Finally, now that we know how to use and train our core correctly, we need to incorporate it into our everyday activities. Just like our breathing patterns, we need to be aware of our posture and core engagement (or lack thereof) throughout our day. Now, I don’t expect you to walk around all day with your core braced as if you’re preparing to take a punch, but your core should turn on appropriately based on the activity you’re doing.
Think of your core activation as a volume knob. Are you bending over (with perfect form) to pick up a pencil? Activate your core 5-10%. Lifting a bag of groceries out of your trunk? Think 50-60% activation. Picking up a heavy box of books while re-organizing your basement? That core better be locked in 100%. It’s easy to do, but hard to make it a part of your daily routine.
It’s just like posture. I’ve yet to meet anyone who is not strong enough to stand up straight–it’s just simply the idea of remembering to do so. It helps to have reminders throughout your day like a Post-It note on your bathroom mirror, an hourly alarm on your phone, or writing it on your forehead with a Sharpie (remember to do it backwards so you can read it in the mirror). Whatever you need to do, you need to make core bracing and activation not only a part of your routine at the gym, but also a part of your daily rountine. The best news is that eventually it will become automatic and you won’t even have to think about it.
Now go do some crunches.
Just kidding 😉

Dan Lauth, CA